|
REPAIRING THE HP DesignJet Z3200
PRINTER
A NEW WEBSITE HAS BEEN
DEVELOPED FOR Z3200 REPAIR NOTES
click here =>
z3200.COM
By Mark Lindquist |
August-December 2014-2016
© Lindquist Studios All Rights
Reserved
Notes on Tools,
Materials, and Procedures - Mark Lindquist 12/10/2014 - updated -
12-01-2016
(These are my own personal notes from repairs I have
made. I have made this web page for my own benefit, so I have a
record of what I have done. If you use this information, do so at
your own risk -
I assume no responsibility for errors.) Any links that are not
hot, just copy and paste into browser.)

HP sells a "care pack" which is an extended warranty, for their Z Series
printers. If and when you buy a new printer, it's a good idea to
have a service contract. Things go wrong, and we all want to get
back printing as soon as possible. But after several years go by,
or even a few, what happens when problems occur and service personnel
are not available, or the repairs are just too costly to afford? I
had such resistance to the suggestion that I could fix my own printer.
Several people on the Luminous-Landscape Photography Forum said it could
be done (particularly Bryan Glynn, and Ernst Dinkla, long time Z Series
printer users); they insisted it was doable.
I pitched a fit on
the forum, and several people agreed with me that there were design
flaws, but ultimately, the prevailing wisdom that the printers
could be worked on came to be.
I have the skills to do printer repair work - I have built machines all
of my life over a 45+ year career as a woodworker and photographer and
have built a great deal of equipment including control panels and
robotic devices in my
sculpture studio.
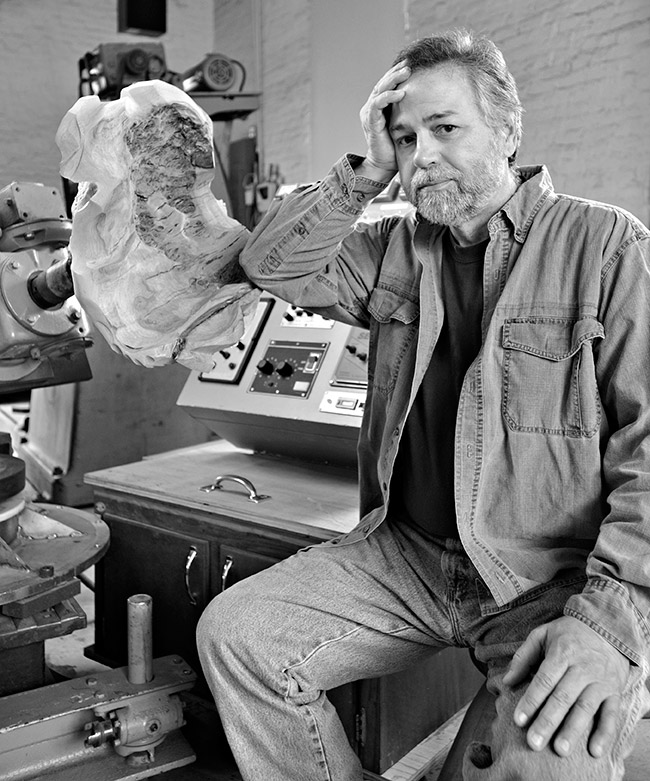
Portrait of
Mark Lindquist in his studio, by John
McFadden
I began working on my printers with the belt replacement procedure, but
soon discovered several other things needed maintenance and repairs as
well, but my attitude has always been that it's "small" work with
detailed and precision requirements done in confined spaces and I didn't
want to do it.
I found that that was not always the case when working on the Z series
printers particularly when the machine is torn down to the frame.
Working on any of the Z series printers is not difficult,
in fact it is rather a similar experience, either working on the 24 inch
models or the 44 inch models. And the Z 3100 models are the same as the
Z 3200 models. This is convenient particularly since the parts are
interchangeable.
THE
HP Z3200 DREADED SHREDDED BELT ISSUE
It's kind of a mystery, when the Z Series printer belts will start
shredding, actually. I think it has to do with usage, but I surmise
infrequent usage can contribute, as the belt would just be sitting in
one position under tension, creating stress at the cog driver and the
tensioner pulley points. But humidity and temp play a factor as well.
That rubber in those cheap belts has a mind of its own and will go soft
when it will. The LPS belts sold online are apparently tougher and last
longer.
Some report belt changes are needed after 3 years, some after 5, but it
varies from printer to printer.
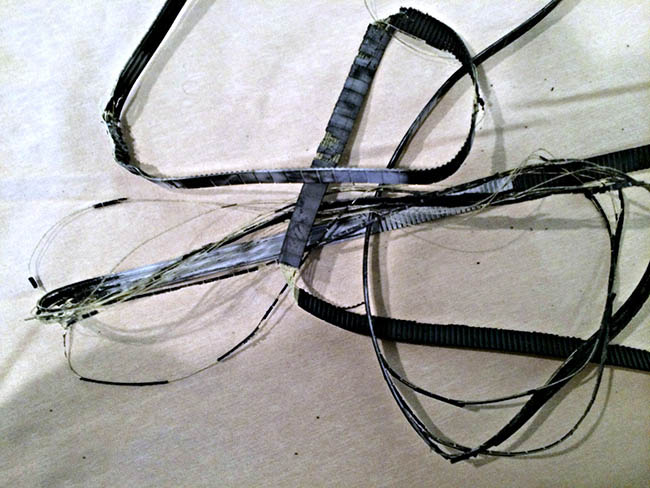
I begin working on my Z 3100 inch plain-vanilla printer when the belt
finally broke. Shredded belts or the "dreaded shredded belt" issue,
as I call it, is
The Achilles' heel of all of the Z 3100 (all Z-series) printers. I
recently replaced the shredded belt on a Z3200 24”
printer that was given to me. Within hours of running it, the belt
shredded (photo above).
The belts are small and they are in my opinion inadequate for the design of
this printer. Essentially the belt is a modified Gilmer belt. The belt
is driven by a stepper motor that moves the printer head via a carriage
rail. Unfortunately since the belt is fastened (actually quite easily to
the bottom underside) of the printhead carriage the entire printer has
to be torn down to the frame in order to access the bottom of the
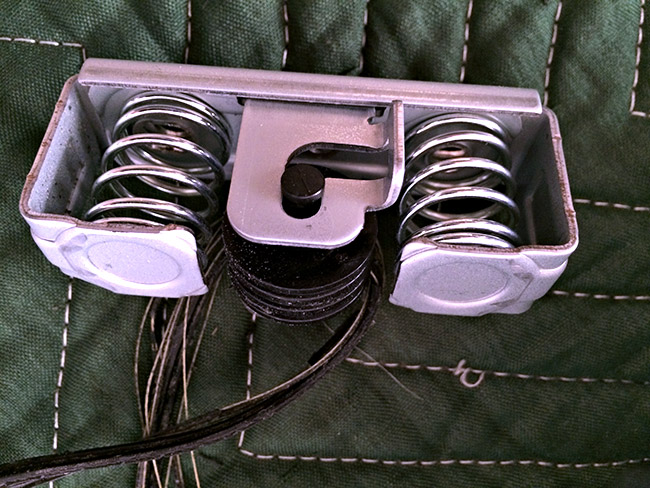
print head carriage: (photo below shows the fastening system
on the underside of the print head carriage.)
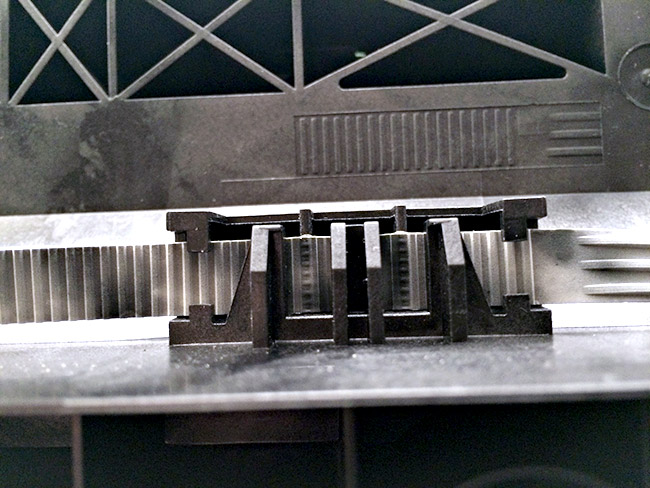
Underside of print head carriage depicting the belt
fastening mechanism on a Z3200 printer.
Positioning of the belt must be exactly as shown.
Parts easily snap out of the printer, such as the belt tensioning pulley
assembly: (Note: when you take the belt tensioning pulley system out,
take both springs out and disassemble the tensioning device. Very
simple, and it saves cutting your new belt when putting it back
together.
In other words, don’t try to feed the belt into the pulley without
pulling the device apart completely, first.)
Doing a belt replacement on any of the Z Series printers is actually a
big job and should not be undertaken lightly or by the faint of heart.
Thankfully, Bryan Glynn (BGPictures, Tampa, FL) has made a video that
details specifically how to disassemble the printer incrementally in
order to get to the belt and several other places that may need a little
work.
The youtube video is here:
https://www.youtube.com/watch?v=U56v6y0FDh4
(Bryan has sold his Z3100
printer, and is no longer supporting it, so best not to bug him - just
send money, LOL)
I watched Bryan's video at least 4-5 times. He
has a ton of good ideas, and suggestions. Watch his video several
times.
Here are Time codes notes that will help in reassembling the printer -
thanks Nackjick:
1) Remove front cover panel (4.74-5.60)
2) Remove left side inspection window cover (9.40-9.60)
3) Remove media lever (10.15-10.54)
4) Remove and bag the inks (10.54-11.00)
5) Remove Network USB port cover (11.00-11.55)
6) Take off the end cover - various screws (11.55-13.04)
7) Remove cutter assembly (13.48-14.06)
So equipped with your manual, your camera, and the wonderful video that
was made to help you, just begin one step at a time, remembering that
each step will carry you that much closer to your goal. Don't think of
just accomplishing the task of replacing the belt however. Think along
the lines of refurbishing your printer, and doing maintenance even if it
means replacing some parts that may not immediately need it. An example
is the rear carriage bearing and the power supply unit fan.
Before you get started, a few folks on Luminous
Landscape forum have mentioned that the carriage and belt can be changed
out without tearing the entire unit apart as is discussed and
illustrated in Bryan Glynn's video.
According to William Chitham:
"One thing I learned this time
round is that you don't need to take off any of the top or back covers
to work on the carriage and associated parts, just the end covers and
the side plate at the left hand end of the carriage rail. You can
disconnect the ink supply with the carriage over the service station,
remove the clips from the trailing cable and out she comes. Bit more of
a fiddle getting it back in but saves a lot of time, there are many
screws in the top cover and ink tube guide rail...."
Actually, tearing the printer down as illustrated in
the video is a good idea if you want to clean and inspect the printer
for parts that are worn, extra dirty, or just need replacing. But
if you are in a hurry, you can always pull the end caps if you know what
you're doing.
All in all, I recommend tearing the printer down and
doing a super clean. That way when done, it's like a new printer.
John Nollendorfs, another LuLa forum member has
some good suggestions in green:
"To make things easier, I would release the print head from the
parking station BEFORE starting to disassemble the printer by going into
"printhead replacement mode" and then turning off the hard switch by the
power cord. This allows you to easily slide the print head back and
forth as needed. This gets rid of the need to do a mechanical release
from the back of the machine later on."
*Note from Mark:
This is a good idea if your belt has not broken and separated.
Once broken, you get an error message and can not get out of it.
There can be no initialization of the printer in order to get back into
the menu to go into printhead replacement mode. If you see the
belt frayed to the point of breaking, it would be a good idea to bring
the printhead carriage out of the parking station as discussed above by
John, then simply unplug the printer.
"Also, I found that it's not
necessary to remove the plexi lid from the top cover of the machine, as
the video instructions indicate. While taking off the cover was not much
of a problem, trying to rehinge 4 plastic hinge pins on a 44" machine
blindly was nearly impossible. I ended up taking the top cover back off
the machine, so I could see how to properly seat the plastic hinge pins
and after adding the dampers in hinge covers, I was able to screw them
back together and then easily put the whole assembly back on the printer
as one unit. Again, it's not necessary to remove this plexi lid--just
remove the whole assembly, following the directions for removing the top
cover."
REPLACING THE CARRIAGE BELT ON Z2100-Z3200ps PRINTERS
According to Bryan Glynn, on his website page detailing the process:
Supplies needed:
New belt
Non-evaporating synthetic machine oil
Cotton pads
Double-sided tape
Paper towel
Alcohol
Flat blade screwdriver
T8, T10, T15, T20 drivers
Canned air
2′ of paper
Expect to spend 2-3 hours on the job, taking your time. One tip I forgot
to show – while you have the carriage assembly out and are cleaning it,
be sure to wipe clean the color sensor shutter mirror. It’s on the tiny
trap door on the color sensor itself. It is often hazy and obscured over
time which can fail the unit. Do not clean the sensor lens or emmiter
underneath, it should not need it at all.
DO NOT assume there are missing steps! If it’s not mentioned DON’T DO
IT! That especially means do not try and relock the release screw for
the carriage.
|
(Thanks to Bryan for permission to publish his copyrighted information
above)
Here is a
LINK TO THE SERVICE MANUAL
(* Warning - very large file - takes a long time to download)
__________________________________________________________________
BEFORE YOU GET STARTED ORDER YOUR
TOOLS AND PARTS
Here are most of the tools I used:
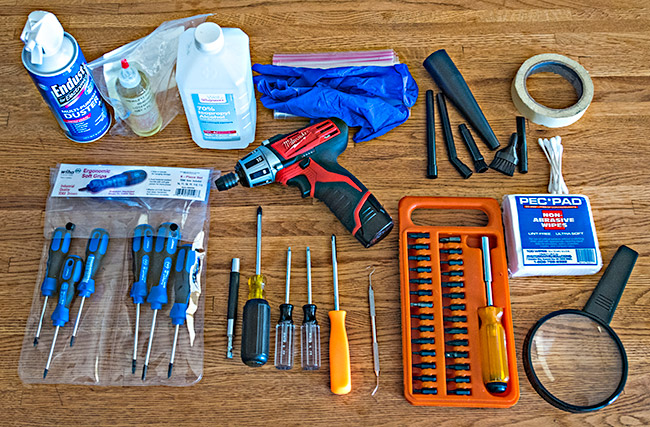
The 6 piece Torx Set is critical.
I got mine at Amazon.
Wiha 45598 Screwdriver Sets, Torx, Cushion Grip, Precision Black Tip,
T6 to T15, 6 Piece. Wiha 45598 Torx 3K series screwdriver set. Six
piece torx blade CVM steel, hardened, precision black tips. Wiha 3K ergo
handle, cushion grip. Set includes T6, T7,T8, T15, T9, T10 and T15.
You don't need to use the Milwaukee cordless screwdriver, but since I
already had it, I used it in some cases just to unscrew screws, NOT to
screw them back in, except for the straps in the back of the printer.
Everything can easily be done by hand. Note the extender driver.
It comes in handy for many purposes. I also had a few worn out
cotton T-shirts for rags, and of course a Shop Vac. The Micro
Cleaning Kit is discussed below.
I've had the driver set (in orange, above for years and years.
Something similar might be the
DEWALT DW2166 45-Piece Screwdriving Set:
If you want or need to magnetize your torx bits to help with
keeping the screws on the end of the torx bits, just get a magnet and
rub them back and forth on the magnet. Test then with the screws
to see how well they hold. If you want to increase the strength,
just rub them on the magnets longer.
ABSOLUTELY CRITICAL
IS BUYING THIS AND ONLY THIS SPECIFIC LPS BELT FOR
YOUR PRINTER:
24”
Belt
|
44”
Belt
*Note: All ZSeries Printers share parts in common. Z2100, Z3100,
Z3200, Z3200ps, etc., ALL the same except lengths.
*NOTE: I do not recommend buying the kit LPS sells, just get the
belt.
You will need to get some extra torx bit screwdrivers that the kit does
not have.
ANY OTHER PARTS FOR THE HP Z3X00 YOU NEED ARE AVAILABLE HERE:
LPS has replacement parts pretty reasonably.
http://partshere.com also has many parts for the various printers.
For maximum success, prepare yourself as I suggest above, and get all
the tools Bryan suggests, and begin slowly and methodically. Take your
time and document what you are doing and have done. The estimates that
say 2- 3-5 hrs are WRONG. When you get into it, you’ll find things that
need replacing, and it’s a good idea to take a break in between
procedures or you’ll fry your brain.
While the Printer is torn down, think about replacing the fan and the
rear carriage bushing. Inspect everything while cleaning it. If the
encoder strip has any ginks in it or and spots that won’t come out find
one and replace it.
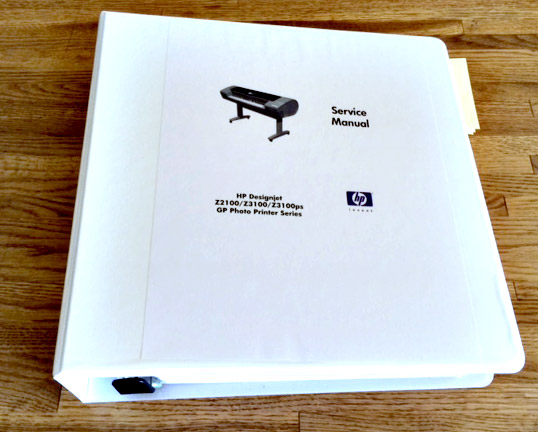
A few words of advice: Make sure you actually have the user manual and
the service manual either on a portable machine or printed out before
you undertake the project. I simply printed the entire document out on
my Canon PIXMA pro 100 in draft or fast mode and took the entire ream to
a local office depot and had them punch the pages and I bought a large
three ring binder and have a hard copy of the manual which comes in very
handy. I like having the manual printed out on standard copy paper in a
three ring binder because it's easy to make notes on the backs of pages.
It was pointed out to me by the Office Depot person that it would not be
good to spiral-bound the manual because sometimes pages get torn out and
with the three ring binder it's easy to replace. Good idea, as well, to
use handy tabs to mark the sections.
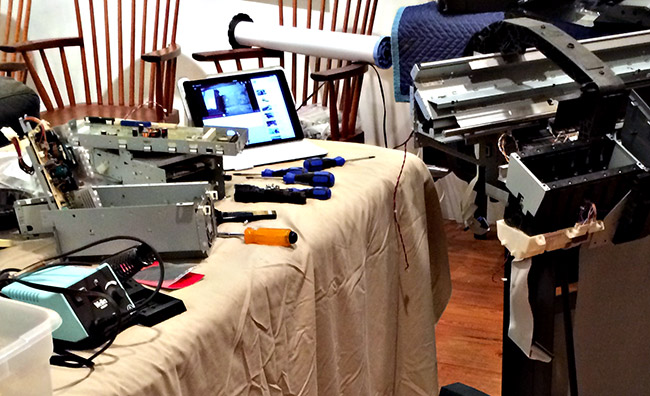
I also have a laptop (iPad) nearby the printer while working on it and I
have the manual queued up on the screen in my office to be able to make
quick reference. Jumping around the manual is par for the course when
working on these printers.
It's a necessity to have an I phone handy or other phone/camera that
takes quick and accurate photos. In every step along the way it's best
to document what you're doing so you can refer back. Always bear in mind
that the video that is a lifesaver only runs one way, meaning that it is
about taking the printer apart, not putting it back together. I had
toyed with the idea of recording the video and playing it backwards and
recording it being played backwards and did fool with that somewhat but
finally decided it just wasn't worth it. Instead, I basically made notes
about each section and I was able to go to the video based on the
timeline so I could play that section over again as many times as needed
until I got it.
When working on these printers what will serve you best is to work
fastidiously. Keep notes, keep photos, keep a journal, and keep track.
If you do these things you will be successful. I got a few different
size re-sealable sandwich type bags so that I could keep the screws for
each section being torn down taped to each major part. I used yellow
sticky notes and put them inside the bags so I knew what part went
where.
I can't stress enough is how important organization and recordkeeping is
when working on the printer. When it is torn down it is a pile of parts.
If the parts are unorganized, the pile becomes junk.
One of the things that I did originally while working on the printer was
to clean everything as I went along. Clean as you go is a great way to
bring the printer back to as new condition. I found a miniature brush
and crevice tool for cleaning computer parts and keyboards and I hooked
it all up to a shop vac. I put a HEPA filter in the shop vac just to
make sure it wasn't spewing out whatever crud that had accumulated
inside of the printer. I will say it's probably a good idea not to use
canned air in the printer due to the fact that shredded belt parts,
paper, lint and overall crud will just get blown around. If you have
to use canned air use it in conjunction with the vacuum. You can get the
Micro-Cleaning kit on Amazon or possibly Home Depot, etc. Just Google
it.

Whenever you take a part off the printer such as an end cap, just clean
it, first with the brush on the vacuum, then with the soft cotton cloth.
If you need to just use a little bit of warm water and possibly a little
warm soapy water dish soap would be best. It's actually important to
think of it as a restoration, and with a bunch of TLC in the end your
printer can look and function largely as though brand-new.
HP Z3200 Printhead Guide Rod Lubrication
Keeping the printhead guide rod lubricated is the best way to prolong
belt life. The print head carriage moves left and right along the
carriage guide rod (or rail). The guide rod is lubricated so the
carriage moves smoothly and with as little friction as possible. The
more easily or freely the carriage moves, means less friction, moving
the head. This translates to less pulling the belt has to do, the less
stress on the belt required to move the carriage.
If you were pulling a sled with bricks on it, with a rope, on a road, it
would take a lot of pulling power to move it and it would cause the rope
to stretch. If you could ice the road, the sled would move effortlessly,
and the rope would not stretch much at all.
The friction is between the carriage head and the guide rod. Lubricate
the guide rod and the carriage moves freely on it, and the belt lasts
longer.
When I had mine apart down to the frame to replace the belt, I cleaned
and oiled the rod with a cotton cloth. Regular maintenance with a few
drops of oil is best between belt changes.
The specified oil:
OFFICIAL HP SYNTHETIC OIL - 3.5oz - $32.00 HP PART # 6040-0855
Link To HP OIL
I personally use
only the HP brand official synthetic oil for the guide rails in our
Z-Series printers -
PART # 6040-0855.
It's getting harder and harder to find at a good price. Here is a
Link to some on Amazon
***********************************************************************************************************************
As discussed in the thread, this is synthetic oil. Best NOT to use
3-in-one.
Ernst Dinkla has suggested:
"...The lightest oil in the Nye Hobbyist Lubricant
Kit is identical to the HP prescribed oil. I have gone through the
specifications of both, there is no difference for this task. Done a
great job for my Zs so far. $25 and you get another oil + a good grease
included. "
Link To Nye Oil on Amazon
******************************************************************************************
NEW INFORMATION ON
NYE OIL FROM TED DICKENS - Oxford, MI
Here's another Amazon link, for Nye oil in a
fancy bottle for only $14.90.
Lubricant, Oil, Shutter 100gram - Nyoil 4OZ
I did some checking on the Nye website. They do not list any product as
Nyoil. I searched for the part number shown on the first of the two
Amazon listings and did not find a match.
In this case, I'm inclined to say that spending an extra $10-15 to get
the oil from HP is cheap insurance. The Nye website makes it clear they
make MANY different formulations. I'd rather not find out that I messed
up the carriage or placed extra stress on the belt because saving money
resulted in me using the wrong complex combination of hydrocarbons. If
folks want to save a couple of bucks, the new HP part number is
available from a number of suppliers with prices ranging from a couple
of dollars less to several times what HP charges."
Thanks for the info Ted - ML
*********************************************************************************************
When your printer is torn down so that you can get at
the guide rail fully, I suggest you watch Bryan Glynn's video (replacing
the HpZ3200 Belt) on
youtube.
At the end of the video, he shows how to clean and lubricate the belt
using a soft cotton cloth, wiping and lubricating the carriage rod.
It's a good idea to do regular maintenance oiling the guide rod every
2-3 months with a few drops of synthetic oil on the right upper side of
the rod in the printer, and on the left upper side of the rod in the
printer, (each a few feet in on a 44" printer)as well. Put a few
drops on the rod in a linear zig-zag pattern, being careful to avoid
hitting the encoder strip. I
figured out a neat trick after oiling. I wanted to move the print
head carriage back and forth the entire length of the rail to spread the
lubricating oil out evenly on the carriage rail. I opened the
window and the printer beeped, of course, and told me to shut the window.
After shutting the window, the carriage went all the way to the left and
back home again. So I opened and shut the window about five times
and on the last, I inspected the rail. The carriage bearing spread
the oil evenly and nicely. When
you lubricate the rail, open and close the window several times.
Works great. Here is a thread explaining how to oil and what oil to use:
Lubricating the HP Z3100-Z3200 Printers regularly
REPLACING THE
HP Z3200 POWER
SUPPLY UNIT (PSU) FAN
If you hear a loud noise coming from the left side of the printer as
you face it, and it seems to whine or squeal, and it continues to get
worse over time, it's probably the power supply fan. Amazing that
such a small thing can make so much noise!
For some reason HP determined that inexpensive parts were adequate for
this printer. A case in point is the power supply fan. When I took the
power supply apart to get at the fan I was really surprised to find that
it was essentially a $3.24 Computer fan with sleeve bearings. It is
unfathomable to me is that a fan that is required to run 24 seven 325
would be so cheap.
If you want to know the exact fan that is used in the HP Z3200ps 24”,
here it is:
The fan that was used in my HP Z3200 24" is a Sunon KD1208PTS1 13.GN 12V
DC

http://datasheet.octopart.com/KD1208PTS1.13.GN-Sunon-Fans-datasheet-9566827.pdf
Here is a photo of the old fan moments after it was removed (check out
the crud on it) you’ll see why blowing compressed air in there is just
not going to get it.
The crud gets caked on!

Ultimately, HP doesn’t have any information about
replacing the Power Supply Unit fan. It takes a ton of work and time to
just replace the fan, (because of having to take the power supply unit
apart) so I’m sure they only wanted their field technicians to replace
the entire power supply and be done with it, due to the cost of labor
and difficulty of tedious work in the field. There are companies who
will trade you your entire PSU for theirs, which has had a new fan put
in and is “refurbished”. The cost will be anywhere from $200 - $600.
Google “HP Z3100 Power Supply Unit Replacement” and you’ll find more
than you want to know.
In order to get at the fan it takes removing upwards of 40 screws from
the power supply unit and a lot of futzing around just to expose the
fan. Having actually pulled the power supply unit and opened it up and
replaced the fan with a quality fan I can say that it is quite a job but
not an unsurmountable one and with a little patience and perseverance it
is certainly doable.
The fan is essentially a simple computer case fan and you can find any
number of them online. If you want to take the easy way out, get an
entire PSU with who knows what fan they put in there and how, and send
yours off, never to be seen again. Just hope they sent you a “good one”
back! If you don’t want to get into replacing the fan yourself - take
the easy way out, send your PSU
here.
I made the decision to replace my own fan so that I could clean the
circuit boards and inspect everything, plus I have an innate curiosity
about how things work. I figured I could take the power supply unit
apart, replace the fan and put it back together in an hour. Wrong. It
takes a couple to 3 hours, anyway, but I work slowly and carefully.
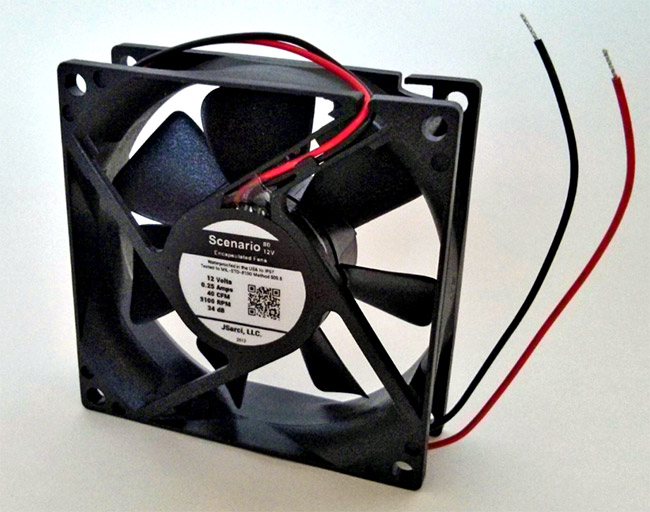
I got a waterproof fan because I figure they are made to withstand a lot
more climate issues. Just get one that has ball bearings instead of
sleeve bearings. I also got this fan because I knew I could easily
splice the wires into the plug and wires of the old, existing fan. It
was an easy fix - just nipped the old fan wires off about 5” past the
plug and soldered everything together and used heat shrink tubing and a
heat gun to go over the soldered areas.
Scenario80 12v - 80mm 12v BLDC Waterproof Fan IP57 - I got mine on
Amazon, but they don’t seem to be available there anymore.
Here is a very effective and simple video on how to
take the PSU out, once you have the printer cracked open:
Simple Screw Location Video
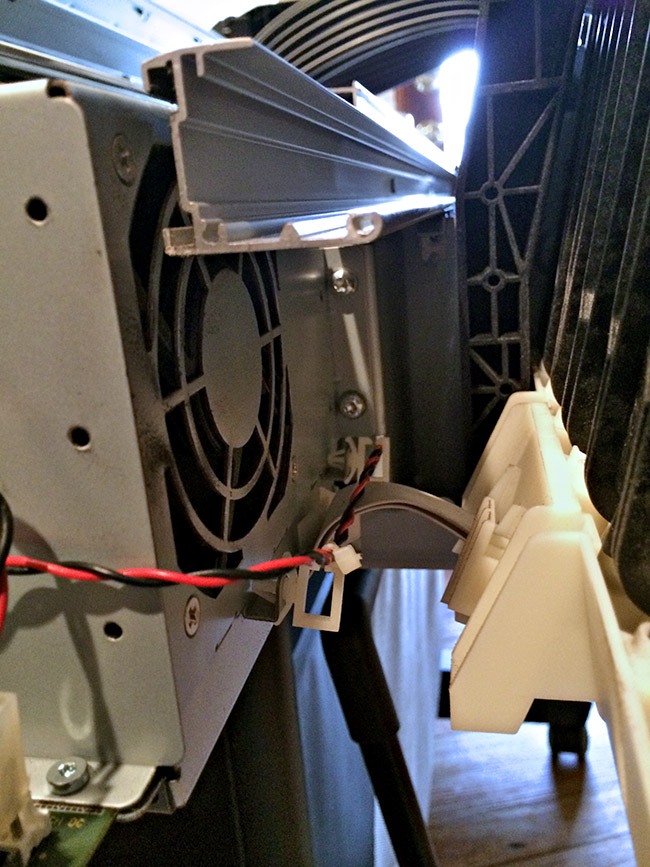
The existing fan is hidden deep in underneath in the back of the PSU. It
gets really dirty and is impossible to get at without taking the PSU off
the printer.
Be careful about taking a compressor hose to it to blow it out (DON’T) -
you’ll blow all that crud all over the electronics inside that are
unprotected.
Before you remove any wires, from the PSU (Power
Supply Unit), be sure to take photos of where things go:
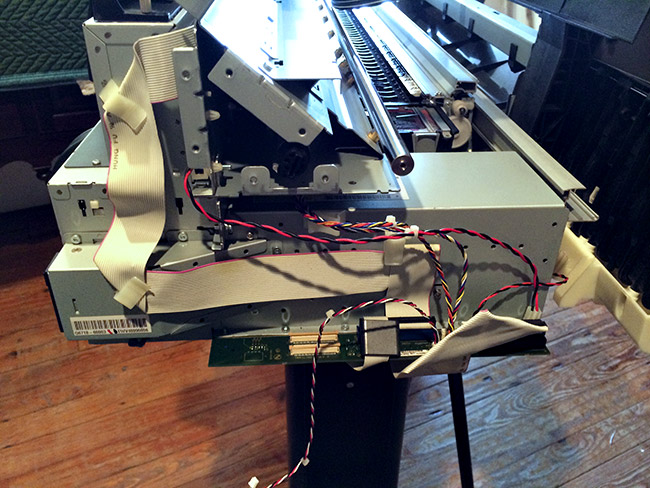
Take close-ups so you know where all the plugs go
back in:

I even took closeups of the wires disconnected:

Once I got the PSU off the printer, and went after
the screws, carefully labeling them (photos help) since there are
different types of screws,
I set up my soldering iron and tools to be able to work comfortably.
Additional Information:
Here is an excellent very short video about how to remove the specific
screws to release the PSU from the printer:
Designjet T Electronics Module - YouTube
Adrian Tsang created a very good blog about repairing the Power Supply
Unit:
Repairing the PSU of a HP Designjet Z3200 | adrian tsang /works
http://adriantsang.info/2012/03/reparing-designjet-z3200/
Cleaning the printhead drop detector:
HP has a
good, simple “How To” here
HP Z
Series (Z3200) REAR CARRIAGE BUSHING REPLACEMENT

The rear carriage bushing (top in photo above), which is the flimsiest of parts in the
printer, is easily broken.
(Notes in green from John Nollendorfs:)
"Nowhere is it well
documented exactly where this bushing is located and how it can be
easily damaged. Before sliding the carriage off the end of the rail,
the bushing is located on top of the carriage, and needs to be carefully
depressed when sliding the carriage back in it's guide slot. If
you can be very careful sliding the carriage off the end of the machine,
you will notice the bushing, as you start to pull the carriage off the
rails. Start sliding the carriage very slowly, and observe the bushing
on top, as it slides out from under the rail."
Thanks for that tip John.
These bushings are getting hard to find and they are easy to break. They are also becoming pricey.
Here is an example:
Pricey Bushing
Rear Carriage Bushing replacement for HP Q5669-60687 on Z2100, Z3100,
Z3200
A replacement is available for about 15 bucks here
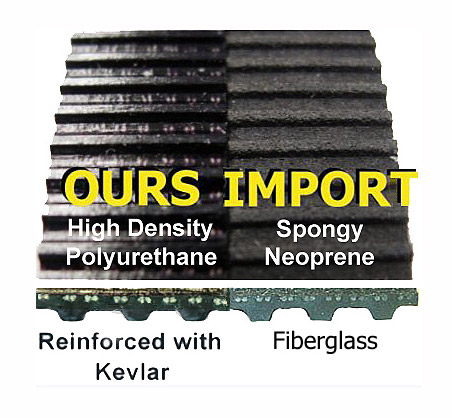
An enterprising guy on eBay with the user name of "oldva"actually decided to manufacture a
replacement that is beefier and much more reliable (bottom in photo
above). "...tough, abrasion
and impact resistant urethane and contains continuous strand carbon
fiber tow running the full length of the bushing."
I ordered the bushing replacement from him and installed it and it works
perfectly.
From his listing:
“...Last year the 'rear carriage bushing' in my Z2100 printer broke
which allowed the print heads to scrape across the media it was printing
on. I was lucky in that the broken part fell on the floor under the
printer, so identification of the problem was easy and I didn't have to
go 'digging' into the printer to recover any broken pieces that might
jam things up. This 'bushing' is one of the components that set the
height of the print heads over the media. Without this 'bushing' in
place the print heads may contact the media, especially if printing on a
thick media, such as canvas or board and leave drag marks in the print
path.
I searched and searched for a replacement part, but at the time none
were available, not even from HP ! It appears that this bushing is a
common failure point, as I have found numerous inquires on the internet
regarding it. So, "Desperation being the Mother of Invention" , I headed
down to our workshop, where we do have some equipment for molding
plastic parts. After noting the failure point of the old bushing, I
designed a mold for a new style bushing which would correct the
weaknesses of the bushing design. I have been running the re-designed
bushing for a year in my printer without any more problems.
This listing is for 2 of the re-designed bushings, so you will have a
spare. It is made from a tough, abrasion and impact resistant urethane
and contains continuous strand carbon fiber tow running the full length
of the bushing. The tabs on either end of the bushing are much thicker
than stock, but the center area maintains the 2mm thickness of the stock
bushing, so print head height remains correct.
Included are photo illustrated instructions of an easy method (I've had
a lot of practice) of installing the bushing in a Z2100 printer, that
does not require the degree of dis-assembly suggested in the Service
Manual. It is still necessary to remove the cover over the right side of
the printer which requires a Torx 15 screwdriver, and in addition you
will need a small flat blade screwdriver and needle nose pliers or large
tweezers and a good light source.
The $15 price includes 2 rear carriage bushings, illustrated
installation instructions and free postage in the USA."
On Luminous-Landscape forum, a member, "Roscolo"
discusses a replacement procedure
shortcut:
"First, you
do this at your own risk. If you need to install a new Rear Carriage
Bushing, I think the odds of you screwing something up are infinitely
greater if you follow the instructions in the z3100 Service Manual (take
the whole printer apart) than doing what I outline below (only remove
the Right Cover), but, bottom line, they tell you to do it their way. I
think my way is better, but don't blame me if you screw it up.
If you replace your belt on the HP z3100 / HP z3200 it is EASY to break
or lose the Rear Carriage Bushing. It is also VERY EASY to miss this
problem until AFTER you have replaced your belt and reassembled your
printer and find that it is dragging the heads or the carriage on your
paper/canvas, streaking/smearing ink, and making some loud banging
noises when the Carriage travels to the right. So when you replace your
belt, double and triple check that your Rear Carriage Bushing is on AND
that it isn't cracked (it is extraordinarily flimsy plastic) and you
won't have to do what I did.
BUT if you need to replace or install the Rear Carriage Bushing on the
z3100 / z3200, the manual tells you to essentially disassemble the
ENTIRE printer just like you have to do to replace the belt. YOU DO NOT
HAVE TO DO THIS (if you're careful.) Just remove the Right Cover. When
you pull the Carriage all the way to the right, (use a bright light
shining in there so you can see), you will see the hole where the far
end of the Bushing goes and the hole where the near part of the Bushing
goes (look at the diagram in the Service Manual). I just used a pair of
needle nose pliers to hold the bushing so I didn't lose it, (don't let
go!) and using a tiny 4 inch screwdriver (tiny like you could remove the
back of a watch with it), was able to gently force the far end of the
bushing into the far hole. Then CONTINUING TO HOLD ON TO THE BUSHING
WITH YOUR PLIERS, push or pull back that fleshy colored piece of rubber
thingy in the way, and you can easily apply tension to install the near
end of the bushing into the corresponding hole. If you bend the fleshy
rubber thingy a bit, use your pliers to bend it back like it was. This
saved me about 8 hours of headache NOT having to tear down and rebuild
the entire printer AGAIN, and eliminated the likelihood that I could
just as easily lose/break the bushing again when having to put the
Carriage back on!
I did this on the HP z3100. I have not done it on the z3200, but my
understanding is the printers are exactly the same in construction."
THE HP Z3100 - Z3200 ESP (color sensor) Spectrophotometer
Occasionally, the Color Sensor or ESP (Embedded Spectro Photometer)
goes bad on the Z series printers. Diagram below is from the HP
Service Manual - section 7-17: (Note the ESP on right, #7)

As Bryan Glynn points out, if and when the print head carriage is
out, while doing repairs, be sure to inspect it, and clean it as
discussed below in the diagram. The color sensor can be repaired,
or an entire print head carriage assembly with the ESP can be simply
changed out. (See manual section 8-92).
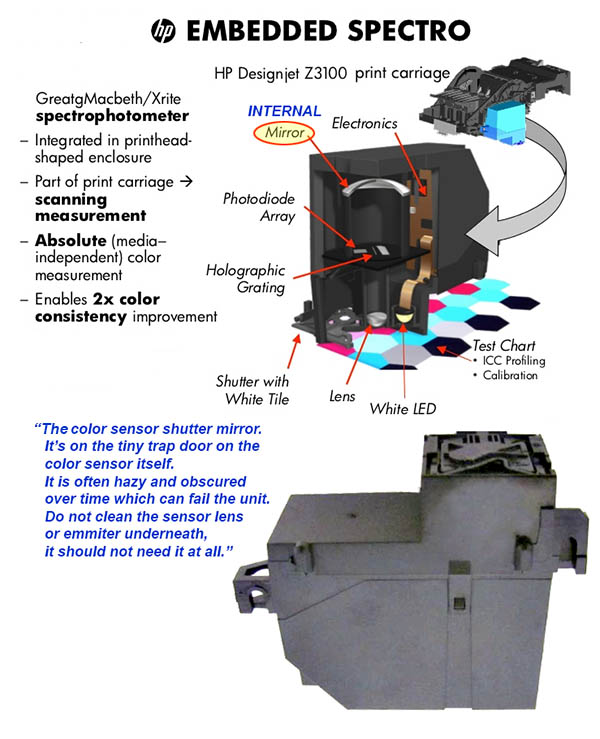
If the color sensor (ESP - figure #7 in first diagram above) acts up
while the carriage is still in the printer, while you are using it, try
putting a bright light in under the carriage on the right side where the
ESP is, get a mechanic's mirror and try spraying a little canned air in
the area of the small trap door shutter. If you can reach it with
a sensor swap or pec pad, etc, maybe you can dislodge any crud that may
have gotten onto the shutter mirror (tile) and perhaps wipe it somehow.
I have not done this while the printer is functioning, but it would be a
last ditch effort before pulling the whole printer apart in order to
pull the carriage assembly.
*Note: The top image is from the HP
Service Manual, parts of the bottom image are from an HP advertisement.
These images may be subject to copyright but are being used in an
educational capacity here.
SOFTWARE ISSUES AND Z SERIES PRINTERS
NOTE:
SOFTWARE CHANGES ARE FAST AND FURIOUS.
Much of the previous information has become obsolete, so has been
deleted. Current information is accurate as of 3-10-2016
HP thankfully provides a series of pages that deal with all the Z Series
printers.
HP DesignJet Z3200ps Software and Driver Download
Page
Type in (or copy and paste): HP Designjet Z Series Printers
(Then find yours in the list)
Once there, under Download options click:
Get drivers, software & firmware.
Again, choose from the list, and so on.
FIRMWARE UPDATES ON Z3200 Printers
Updating the firmware is a personal matter, I am afraid. Some
people say don't do it, others say do it at the first opportunity. HP
says upgrade when the Firmware upgrades become available. With my
Z3200ps 44" printer, running on my Mac Pro Tower, I did do the firmware
upgrade and it was no problem. Also, I have upgraded the firmware
on my Z3200 24" printer, with no problems.
To download the firmware, go to each driver page and the firmware is
included in the list.
Look on the back of your printer and determine what
the Model or Product Number is (something like Q6718A). If it ends
in "A" choose Revision A Firmware Download. If your printer
product number ends in "B", download Revision B Firmware. Save the
download, then run the Firmware through the HP Utility. Very easy,
just follow instructions. Really, really, follow the
instructions....
WORKING WITH OTHER COMMERCIALLY AVAILABLE PAPERS
The chart below (and the link above) show the
specific settings for working with HP Papers and papers from third
parties. This is a hugely important chart, which helps in
understanding critical settings when creating custom profiles.
*NOTE that the chart indicates the 6 specific
papers/presets that use QUAD inks in red.
Also, the chart represents what can be used on the Z3200 and Z3200
ps versions.

OLD HP document that discusses working
with paper presets with the Z3100 Printer from 2007
An original HP Tech Newsletter for Z3200 - "Working with Other
Commercially-Available Papers"
Tech
Newsletter: Working with Non-HP Papers - (Z3100 - June 2007) -
Important document
ORIGINAL
PAPER PRESET LIST GOING BACK TO HP Z3100

*NOTE: HP Documents have
been archived for HP Z3XXX users and may be subject to copyright
It is assumed they are being used here under "Fair Use" for educational
purposes only.
The links are obsolete.
How to find your printer's information:
(won't work with USB - only LAN connection)
Here is a way for you to check out all the info about your printer:
Go to the front panel of the printer and press the start button and wait
for the printer to initialize.
Next read and make a note of your computer's address, if you are using
your network to print.
Type that address into your browser (see attached image).
That will show you the status of your inks and printheads.
Click the third to the right green tab that says "support".
Then click the bottom "service support on left.
Everything you ever wanted to know about your printer is in there.
You can go to event logs and see what problems it has been having.

HP Design
Jet Z3100/Z3200Plotter Error Codes
| |
HP DJ
Z3200 system error 01:10 |
A problem with the
Electronics module has occurred. |
| |
HP
Z3200 System error 01:11 |
The electronics
module has detected a connection problem with the cooling
fan. |
| |
HP
Z3200 System error 01:12 |
The EEROM is not
configured correctly. |
| |
HP DJ
Z3200 System error 01:13 |
A problem with the
Electronics module has occurred. |
| |
System
error 02:10 |
A problem has
occurred with the carriage assembly |
| |
System
error 02:13 |
A problem has
occurred with the carriage assembly |
| |
System
error 03:10 |
A problem has
occurred with the printers power supply. |
| |
System
error 04:11 |
Jet direct network
card not detected. |
| |
System
error 05:09 |
Formatter installed
instead of HP-GL/2 accessory card |
| |
System
error 05:10 (only) |
Formatter card
failure, or Formatter card not detected |
| |
System
error 05:10 |
HP-GL/2 accessory
card failure |
| |
System
error 06:03 |
Hard disk error |
| |
System
error 08:11 |
The front panel
cannot be detected. |
| |
System
error 11:11 |
The trailing cable is
poorly connected |
| |
System
error 11:13 |
Problem with setting
the voltage of the printheads |
| |
System
error 12:11 |
A short has been
detected in the carriage assembly |
| |
System
Error 17:11(DJ Z3200 only) |
A problem has been
detected while initializing. |
| |
System
error 21:10 |
A problem has been
detected with the Service Station assembly. |
| |
System
error 21:11 |
A problem has been
detected with the Service Station assembly. |
| |
System
error 22:10 |
A problem has been
detected with the Ink Supply Station. |
| |
System
error 41:10 |
A problem has been
detected with the Paper-Axis motor |
| |
System
error 41:13 |
An error in the
paper-axis motor encoder quadrature has occurred. |
| |
System
error 44:10 |
A problem has
occurred with the Scan-Axis motor. |
| |
System
error 43:10 |
A problem has
occurred with the Vacuum fan. |
| |
System
error 43:11 |
The Vacuum fan is not
detected. |
| |
System
error 55:11 |
A problem with the
line sensor has occurred |
| |
System
error 56:10 |
Drive roller encoder
sensor error. |
| |
System
error 56:13 |
An error in the drive
roller encoder sensor quadrature has occurred. |
| |
System
error 61:04 |
Firmware error. |
| |
System
error 61:05 |
The printer was not
able to process a job that was sent. |
| |
System
error 62:03 |
Parallel port
communication problem |
| |
System
error 63:03 |
LAN card
communication problem |
| |
System
error 64:03 |
USB port
communication problem |
| |
System
error 64:04 |
Firmware error (USB
port). |
| |
System
error 65:03 |
Generic input/output
port communication problem. |
| |
System
error 71:04 |
Problem allocating
memory. |
| |
System
error 71:06 |
Out of memory
problem. |
| |
System
error 72:04 |
Problem in the
scan-axis (firmware error). |
| |
System
error 73:04 |
Server error. |
| |
System
error 79:04 |
Miscellaneous
firmware error. |
| |
System
error 81:01 |
Paper-axis shutdown |
| |
System
error 81:11 |
Paper-axis shutdown
(during the paper advance test). |
| |
System
error 85:10 |
Paper-axis shutdown
(during the paper advance test). |
| |
System
error 86:01 |
Carriage-Axis
shutdown. |
| |
System
error 86:11 |
Carriage-axis
shutdown (during the carriage movement test). |
| |
System
error 86:13 |
Carriage-Axis
shutdown (firmware error). |
| |
System
error 87:13 |
Unable to read the
carriage encoder sensor. |
| |
System
error 93:10 |
Ink System startup
failed. |
HOW TO
KEEP YOUR Z SERIES PRINTER RUNNING in TOP SHAPE
There are a few things that are required to
make the Z Series printers run well if not perfectly:
Regular basic housekeeping maintenance
Keeping the guide rail lubricated
Print head alignment
Periodic nozzle cleaning
Diagnostic printout checks
Keeping the printer running at all times
Occasional re-starts, unplugging printer
Always calibrating papers
Using advance paper calibration for larger or custom papers
Use of out of warranty inks and printheads is ok if your printer is out
of warranty and you're on your own. But if the inks or printheads have
expired past two years or more, question it and replace them.
Always shake inks vigorously if printer has sat for a long time.
Keep printing - run test prints at least weekly if possible.
Best to have printer plugged in to a UPS for surge protection and back
up power.
When problems occur, begin with a diagnostic image printout, and go from
there.
Always start at the wall when trouble shooting. In other words check
power and connectivity first.
Always shut down and unplug the printer and restart before attempting
any further troubleshooting .
REMEDIAL STEPS FOR MANY SITUATIONS WHEN
PRINTER IS NOT WORKING WELL
TURN OFF PRINTER ON/OFF SWITCH WHEN
CARRIAGE MOVES INTO MIDDLE WHEN YOU OPEN LID. UNPLUG PRINTER
1. Take out all inks and put them in plastic freezer bags, seal them up
and shake them up really good. And I do mean shake them really well for
a long time - like 3-5 minutes vigorously. Put the inks in individual
bags then all the bags in one big bag, and shake all at the same time.
2. Take out all printheads and do the same thing to them - seal
them in freezer bags and shake them vigorously for a long time.
3. Use a left over pad for cleaning the contacts on the printheads, use
that and re-clean the contacts in the print head carriage. (Some say
coffee filters are good. Pec pads work well too).
4. Do exceptional cleaning inside the printer. Cleaning the encoder
strip and the cleaning station (use distilled water and lint-free
wipes).
Don't just so-so clean the cleaning station - really get it brand new
clean.
Put everything back, Inks first, making sure all sockets are clean, then
put in the printheads themselves.
NEXT: TURN ON THE PRINTER
1. Allow the printer to re-initialize and go through resetting/aligning
all the printheads. This will take some time. If it just comes up
without initializing, do a printhead alignment. Then, next:
2. Immediately do a full nozzle clean as soon as possible.
3. Print a diagnostic image and check the chart. Print on Glossy or
semi-gloss paper.
4. Compare this new chart with any previous charts.
5. If there are any suspect print heads, either re-clean and do it again,
or replace.
6. Make up a square of black or whatever color is giving you problems
and print it numerous times.
Try printing again. If there are problems:
Turn it off from the front panel. Turn off the switch, unplug it and
wait a few minutes, then plug back in
and turn it back on.
This often helps.
*NOTE:
If any of the ink cartridges are low on ink when replacing the
printheads, the printer may think the new printhead is faulty when
actually it is that the ink cartridge is too low to fill the new
printhead. Always have cartidges that are mostly (at least 1/2)
full when replacing a printhead or you might get the error message to
replace the printhead.
SPARE PARTS FOR Z SERIES
PRINTERS:
It's a great resource just to be able to look up the
part numbers:
SPARE PART PLOTTER BARGAINS
LETTING YOUR Z3200 (Z Series) PRINTER SIT FOR MONTHS AT A TIME UNUSED
If you have to leave your Z Series printer alone for several
months at a time it can be a small challenge to get it back running.
I left both of my Z Series printers (24" Z3200, and 44" Z-3200ps) on and
running just plugged in to a UPS and took off for a 2 1/2 month photo
shoot out in the wilderness. I was confident that the micro-drip
technology would work well, and for the most part it did. When I
got back, the first thing I did was to check the ink levels. Next
I cleaned the printheads. Then I printed out diagnostic images.
Whoops, the magenta rectangle was gone. I mean not there. Went
directly to the printheads and cleaned them and tried another diagnostic
image. Nope.
I keep a stash of printheads and rather
than fiddle around trying to get this one running again I just replaced
it. After replacing the printhead and
examining the alignment chart, for good measure, I cleaned the
printheads, all, fully, again. Printed another diagnostic image
and Wallah, bingo, good to go. Not bad for leaving it unattended
for 2 1/2 months. Always try this method before jumping to
conclusions that it might be something more serious. The charts
are your friends.
LINKS:
HP
Designjet Z3200 –
Print Permanence Ratings (preliminary1)
wilhelm-research.com
Ernst Dinkla
SpectrumViz
Ardenburg Imaging & Archives
Mark
Lindquist Photography
Go To: Luminous Landscape Printers, Papers and
Inks Forum >
Acknowledgements:
SPECIAL THANKS, AND APPRECIATION TO
ERNST DINKLA
FOR ALL HIS HELP AND SHARED KNOWLEDGE OVER THE YEARS
- Thanks very much Ernst.
Special thanks to Bryan Glynn
Appreciation For All Who Have Contributed to this page
HP and the Barcelona Team
Carles Magrinyà
*Special thanks to all the great folks on
The Luminous Landscape Forum ( Printing: Printers, Papers and Inks)
there is a great deal of knowledge and help there. Professional
printers, photographers, artists, and hobbyists, all share their
experience and knowledge. An excellent resource.
*NOTE: I very much
appreciate the thank-you notes and emails. I have a super busy
schedule and unfortunately I can't answer all questions individually.
If you have an issue with your printer, bring it to the
Luminous
Landscape forum if you can't fix it from the info on these pages.
It's a great resource for many issues and it has great folks on it!
That way, you can benefit from other opinions as well.
Please remember, I have made this page for my own notes - as I get older
I forget how I fixed something, so this is a kind of journal. If
you use the information, do so at your own risk. If it works, I'm
a genius. If not, I warned you. Take care of your printer
and it will take care of you.
The best way to get long life out of the belt is
to Lubricate the guide rod!!!!
TOP
By Mark Lindquist |
August-December 2014-2016
© Lindquist Studios All Rights
Reserved |