CLEANING HP Z3100 - Z3200 Printheads,
manually and internally

(Above), each HP Z Series printhead comes in it's own tub and has
orange protective caps that keep the printheads moist and
free of dust.

(Above), the "business end" up - the section of each printhead
(nozzles) that
ink squirts through. Note the electrical contacts on the
left.

(Above), closeup of HP 70 printhead showing the two sides, or double heads
with two colors. Each printhead has a trough of ink
and as it becomes used, over time the heads become clogged
and ink builds up. If the printer sits idle for too
long, this is what results - commonly referred to as
"clogged printhead", or "clogged nozzles". Sometimes, through the head
printer cleaning routine, a printhead can be unclogged, but
more often than not, more drastic measures are required to
make a printhead become unclogged and fully functional.
If it takes too much cleaning to bring a printhead back to
life, then to me, it's just not worth it. Since
printheads cost less than half the price of a new 130 ml ink
cartridge, it becomes expedient to simply replace the
printhead with a new one. Clogged printheads can
become a real pain, and sometimes it is just not worth the
time to mess with them.
Still, in all, if some are frugal, or in a jam, there are
methods to make them work.
I prefer to use a combination of internal printer head
cleaning and manual cleaning and wiping. HP is careful
in their instructions, recommending that little to no wiping
be done on a print head, but I have had success in certain
cases, as have many on the web who advocate printhead
cleaning.
Here are HP's instruction about cleaning:
Gather the appropriate
cleaning materials:
Any clean, soft, lint-free material that will not come apart
or leave fibers behind when wet (coffee filters work well)
Enough distilled, filtered, or bottled water to moisten the
cloth. Avoid using tap water, which could contain damaging
contaminants
Paper towels, or sheets of paper to rest the printheads on
during cleaning
Gently wipe the printhead contacts with a dry, clean, soft,
lint-free cloth.
If some residue remains, slightly moisten the cloth with
distilled, filtered, or bottled water and continue wiping
until the contacts are clean.

The most successful method I have used
time after time is this:
Put just the bottom of the offending
printhead in a small tray of warm water under the sink.
Continue soaking the bottom of the print head, occasionally
cleaning the bottom with a lint free cotton cloth.
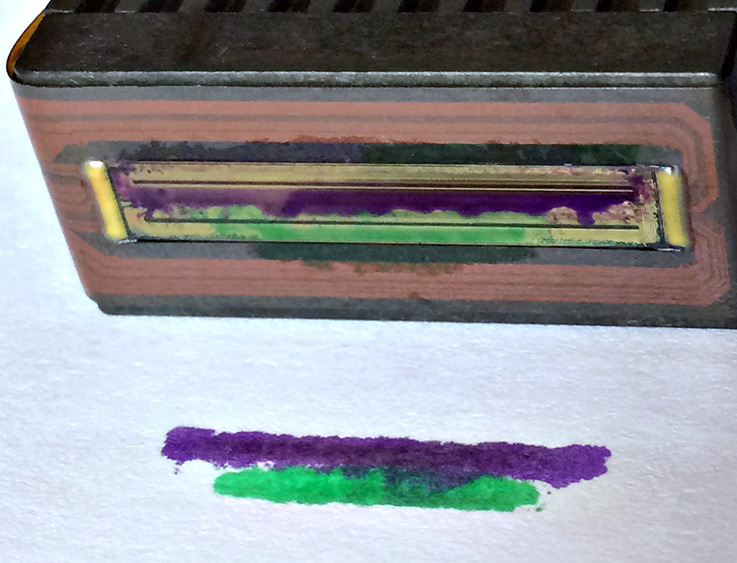
After 15 or 30 minutes, dry off the print head and "stamp" a
folded over paper towel.

Look carefully at the pattern. If the print head is working
right, a consistent line of blue and green (if it is a BG
head) will show up perfectly. If there is a clog, only part
of the line will show. Compare the lines side by side,
looking carefully. These line patterns will correspond
exactly with a diagnostic image. Keep soaking and cleaning
until the printhead shows a clean stamp pattern.
I worked for an entire day on the printhead above and could
not get a perfect stamp. Of course one could keep
going and keep trying and maybe, perhaps, possibly, get
there, but I broke down and just ordered a new printhead.
It's easy to think that "maybe the next trick will work",
but not necessarily.
Windex as a next step sometimes works, but be aware,
isopropyl alcohol, nail polish remover, etc., will likely
get you into trouble.
A youtube video explains how to
clean printheads seven different ways:
7 WAYS TO CLEAN PRINTHEADS
READING AND
UNDERSTANDING HP Z SERIES PRINTHEADS AND CHARTS
The key to cleaning print heads on HP Z Series printers is
to be able to know what is actually wrong with the
printheads at any given time. The only way to
accomplish this is to be able to view a graphic
representation illustrating what each printheads is doing
and how it is performing.
HP has created a utility program to enable internal cleaning
of the printheads from the front panel of the printer and an
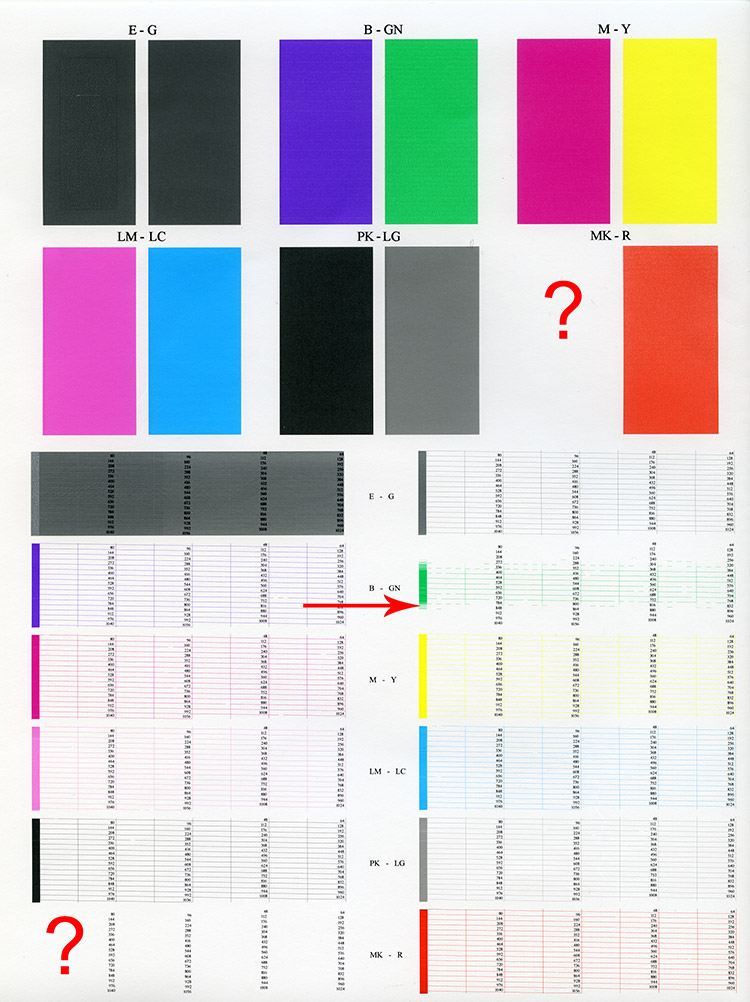
option to print out a diagnostic chart. Below, is a
diagnostic chart that clearly indicates problem areas with
several printheads. Each print head uses two colors,
for example Blue and Green, Magenta and yellow, etc.
One print color can be printing perfectly and the other
might be totally inoperable. Each HP 70 ink printhead
has two compartments for ink and corresponding print heads
beneath that the ink is squirted through.
Notice in the chart how the horizontal lines and washed out
colors clearly illustrate the areas where ink is not passing
through the printhead. In the color patches on top,
the colors should be solid and filled fully. In the
linear diagrams beneath the color patches, notice how the
lines should be solid on the left, and in the horizontal
lines to the right of the vertical lines they should also be
solid and well defined. Each area of the chart is
designed to correspond directly with where the printhead is
malfunctioning.

When I first started with a 24" Z series printer that was
given to me, barely any colors were showing at all on the
diagnostic chart. It took several weeks of printhead
cleaning, manually and internally, and in a several cases
replacing the printheads until the colors came back fully on
the printhead diagnostic image. The chart below shows
gradual progress, but indicated areas of malfunction -
arrows in red point out clogged areas. Notice that entire
areas of color are missing.
Each time a printhead is seated or reseated from the panel
install, with prompts, a printhead calibration chart (printhead
alignment chart) is automatically generated. Notice
the green areas which show areas of non-function.
These charts can be made with just about any paper, but
glossy papers show the areas best, and the charts become
easier to read.
The green areas on the charts above and below, correspond
directly with the "stamped" pattern of the actual printhead
(below). You can take any printhead, and stamp it on a
folded over piece of paper to diagnose directly where the
printhead is malfunctioning.

In the last chart, below, almost all problems have been
cleared up and the printheadsw appear to be printing well
and as normal. Scroll back to the top chart, then back
here, and it clearly illustrates how far the cleaning and
replacement process journeyed to get back to normal.

Here is a tried and true technique that I use when I have
issues with a printhead and need to get back printing ASAP
(before a new one is delivered):
Take all the heads out, (by opening
the cover, and when the printhead carriage is in the correct
position, turn the back main power toggle switch off, then
unplug the unit). Squeeze and vigorously shake each
printhead, and one by one, blot, then replace, until all
printheads are reinstalled. It helps to clean up the
interior of the printhead carriage and to clean the
contacts, etc. Close the window, plug the cord back
in, then run a printhead alignment, then a full head clean
for all printheads, then print out a diagnostic image.
This method works well up to a point in bringing it the
printheads back to life. If there is just one
troublesome printhead, no need to pull them all. If
you pull them all, it is likely to improve overall.
The diagnostic charts are your friend - learn to read
and understand them.
Once a chart looks like the one above, further tweaking can help, but
afterwards, getting that last few percent is difficult, and
could perhaps only be achieved by replacing all the printheads with new ones. This is the goal,
however; to have a clean diagnostic chart, a clean printhead
alignment chart, and the assurance that the printheads are
working as designed.
Bear in mind, according to HP:
The Nozzle Print Test test is
designed to check if the Printhead nozzles print correctly.
The diagnostics test prints out every single nozzle of each
Printhead without applying an error hiding or alignment
algorithm.
For each Printhead, you can see both the adjacent and the
consecutive nozzles.
If any nozzles are not printing correctly they will be shown
on the right of each Printhead Nozzle test.
There is a series of numbered stepped diagonal lines. If one
or more of the nozzles are clogged, malfunctioning or mis-
positioned, you will see that the stepped lines are broken
or misdirected in one or more places.
(For example), [if]... the stepped lines highlighted in
yellow are broken. When the line is completely broken, this
means the nozzle is out.
(For example), [if]..., the stepped lines highlighted in
yellow are misdirected. When the line is misdirected, this
means the nozzle is malfunctioning or out of position.
Print Quality
On the left of each Printhead Nozzle test, there is a series
of horizontal straight lines. If one or more nozzles are
misdirected there will be unequal spaces between the
corresponding lines.
Corrective Action
If the printer has nozzle defects, you can still get perfect
print quality results. The printer can automatically
compensate for nozzle defects, so there is no need to
replace the Printhead.
The method of improving Nozzle Defects is to:
1 Recover the Printheads, using the Front Panel Main
Menu/Image Quality Maintenance/Clean Printheads option.
2 Reprint the Printhead Nozzles Test Plot to verify that the
defective nozzles have been corrected.
3 If the problem continues, replace the defective Printhead.
Corrective action, of course varies, and particularly
depending on your schedule and availability of a new
printhead. If you want to play it totally safe - just
go buy a new printhead and follow instructions. Keep
in mind that just changing the printheads out is not always
the answer. Other problems such as clogged ink tubes,
and other "cans of worms" can be the culprit.
Usually, however, just doing thorough
cleaning and judicious printhead cleaning and/or
replacement, and most of all, keeping the machine ON
24/7/365, does the trick.
*NOTE:
If any of the ink cartridges are low on ink when replacing
the printheads, the printer may think the new printhead is
faulty when actually it is that the ink cartridge is too low
to fill the new printhead. Always have cartidges that
are mostly (at least 1/2) full when replacing a printhead or
you might get the error message to replace the printhead.
PRINTING TEST IMAGES
Perhaps the gold standard of test images is what
photographers and printers
commonly refer to as:
"The Atkinson
Printer Profile Test Image"
 |
What made this chart so successful (which is still
used by hundreds of thousands of photographers today) beyond
its intended use, is that
it presented a wide array of colors and tonal ranges.
What made it most valuable is that it organized and
quantified color in a coherent, readable print. If the
images looked right, then your profile and color workflow
was probably right.
A similar chart can be made from your
own photos. If you know them well, you can organize
them similarly and you'll be able to tell if they look right
to you when the whole page is printed out.
Search the internet for test images made by
photographers. They frequently post them to download
and print.
*The Atkinson image above is copyright Bill Atkinson.
It is being used in an educational capacity in this context.
Search the web for more information and a larger chart.
Printer exercise images
Certain images can be used to exercise your printheads.
If a printer is left sitting for prolonged periods of time,
it's a good idea to run a printhead exercise print once a
week.
Below is my printhead
exercise print, free for download.

Click image above for larger print image
(These are my own personal notes from repairs I have
made.
I have made this web page for my own benefit, so I have a
record of what I have done.
If you use this information, do so at
your own risk - I assume no responsibility for errors.)
|